Did you get a new iPhone or switch carriers? Then it’s time to set up your voicemail! Fortunately, setting up voicemail and visual voicemail on an iPhone is a straightforward process, and can be done in a few easy steps.
This process should work on most modern iPhones, right up to the iPhone 15 and iPhone 15 Pro. You will want to make sure that iOS is updated before you begin—do this by going to Settings > General > Software update. Once you’ve updated to the latest version of iOS 16, you should be all set.
You can even save your visual voicemail messages as notes or voice memos or share them with Apple’s built-in apps — Messages, Mail, or AirDrop.
How to sign up for Visual Voicemail
Nearly every cell phone carrier supports Apple’s Visual Voicemail, even many of the smaller ones. Apple offers a full list of carriers and what features they support for your reference, but it’s safe to say you’re covered if you use any of the big carriers.
However, not every plan includes Visual Voicemail by default, and some carriers may charge extra for it. To make matters even more confusing, some carriers use the term “Visual Voicemail” to refer to a variety of different services that also cover Android smartphones and other devices, so make sure you have iPhone Visual Voicemail set up as part of your plan. Most carriers do this automatically if you purchased your iPhone directly from them, but you may need to be more specific about your requirements if you’re bringing your own iPhone onto a new carrier.
It’s pretty easy to tell if you don’t have the correct iPhone Visual Voicemail plan, as none of the steps below will work. Instead, tapping the Voicemail button in your Phone app will simply place a call to your basic voicemail service, where you’ll need to key in your passcode and retrieve messages the old-fashioned way, using the numeric phone keypad.
How to set up voicemail on your iPhone
Once you’ve subscribed to a plan with the proper iPhone Visual Voicemail service, it’s easy to set up voicemail on your iPhone. Here’s how to proceed:
Step 1: Open the Phone app, which is located at the bottom of your iPhone home screen by default.
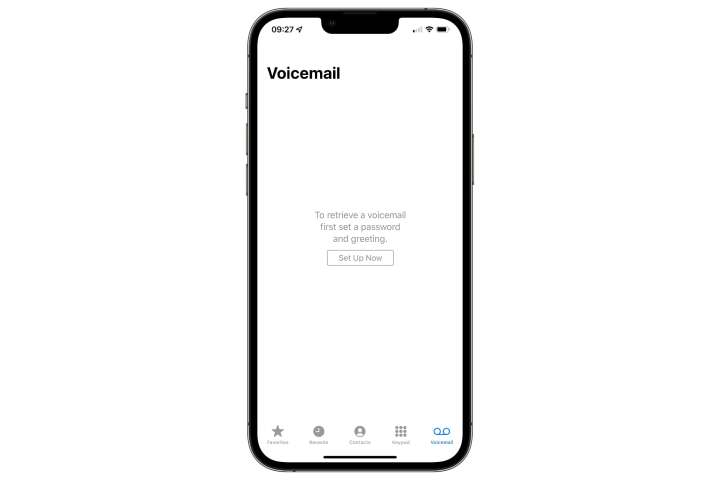
Step 2: Tap the Voicemail button in the bottom-right corner. This is also how you will access your voicemail messages once everything has been set up.
Jesse Hollington / Digital Trends
Step 3: This should bring you to a screen with instructions on how to set up Visual Voicemail with a Set up now button in the center. If this shows a Call voicemail button instead, or automatically dials your voicemail service and shows you a numeric keypad, you haven’t properly subscribed to Visual Voicemail. In this case, you’ll need to contact your carrier to help you get the correct service added to your plan.
Step 4: Tap Set up now to begin configuring your Visual Voicemail service.
Jesse Hollington / Digital Trends
Step 5: When prompted, enter a passcode for your voicemail service. This passcode will be needed if you ever want to access your voicemail messages from another phone, or if your iPhone can’t access the Visual Voicemail service, such as when you have no data coverage.
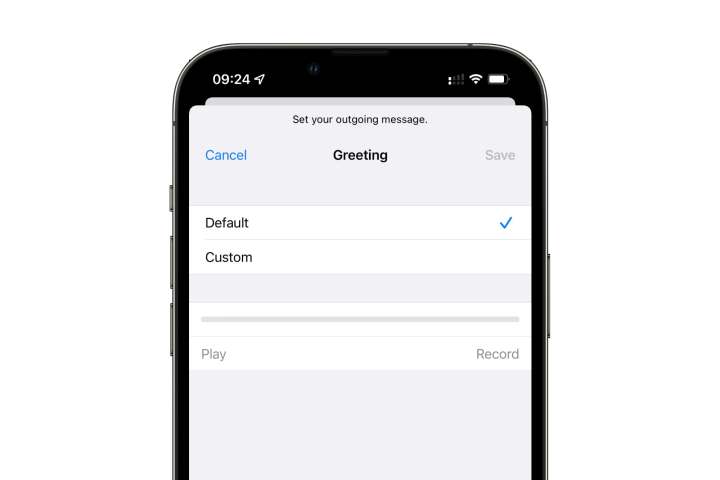
Step 6: After you’ve selected a passcode and confirmed it, it’s time to select how you would like callers to be greeted when they reach your voicemail. Select Default to use the standard visual voicemail greeting, or Custom to record a message of your own.
Jesse Hollington / Digital Trends
Step 7: If you choose to use a custom greeting, tap the Record button to begin recording your greeting. Tap Stop when finished. Tap Play to listen to your greeting, or Record to erase the previous recording and try again.
Step 8: When satisfied with your greeting, tap Save.
How to listen to Visual Voicemail messages on your iPhone
Once Visual Voicemail has been configured, new voicemail messages will appear in the Phone app in much the same way that emails appear in your Inbox. You’ll be able to see a full list of all of the voicemail messages that you’ve received, including the date and time, who they’re from, and their length. You can open and listen to any message simply by tapping on it, without the need to go through the more cumbersome process of dialing into your voicemail service and using the numeric keypad to navigate through it.
Step 1: Open your Phone app.
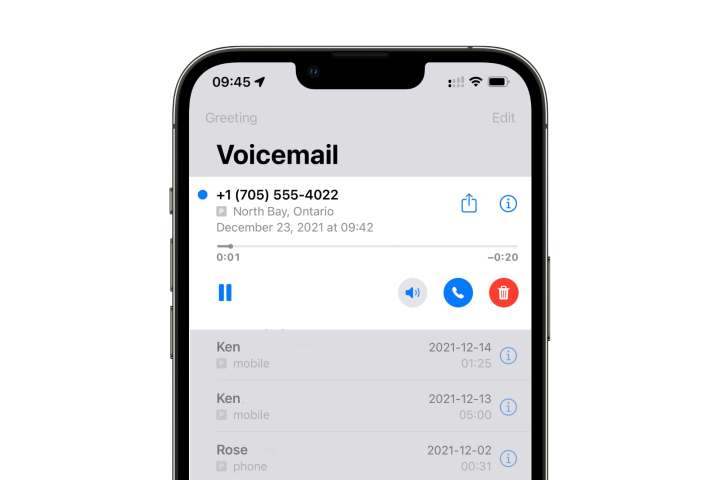
Step 2: Tap the Voicemail button in the bottom-right corner. You should see a list of any voicemail messages you’ve received. New messages will be marked with a blue dot.
Jesse Hollington / Digital Trends
Step 3: Tap on a voicemail message to listen to it. New messages will play back automatically, while a message you’ve already heard will expand to show a playback button that you’ll need to tap on to listen to it again. From this expanded view, you can also tap the speaker button to switch between the earpiece, speakerphone, or another audio device (such as a set of AirPods). Additional buttons let you call the person back, share the voicemail message as an audio file, open the contact details, or delete the message entirely.
Jesse Hollington / Digital Trends
How to get Visual Voicemail Messages with Siri
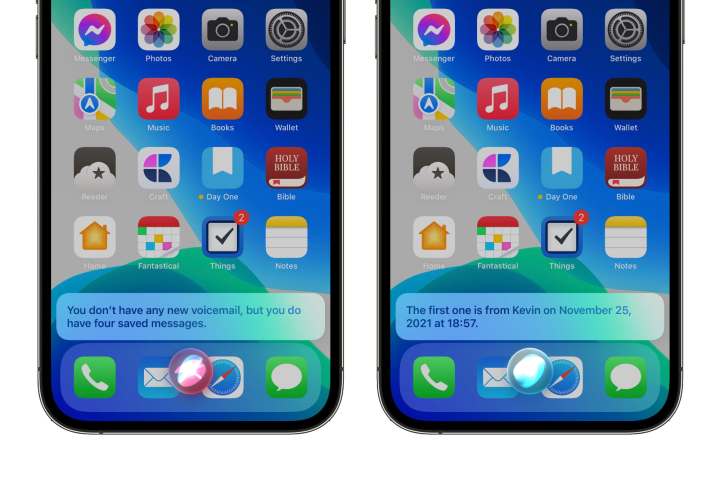
One of the great things about Visual Voicemail is that you can also call up your messages directly using Siri. This isn’t confined to just new messages either; you can ask Siri to play back messages from specific callers or even listen to messages from specific dates. Here are a few examples of things you can say to Siri to call up your Visual Voicemail messages:
- “Hey Siri, listen to my new voicemail messages.”
- “Hey Siri, listen to my voicemail messages from Tim Cook.”
- “Hey Siri, listen to my voicemail messages from November 25th.”
- “Hey Siri, listen to my new voicemail messages from today.”
Note that if you specifically ask for new voicemail messages, Siri won’t play anything back unless there are actually new messages that match your request. However, if you simply ask Siri to “listen to voicemail messages,” without adding the word “new,” then you’ll first be told that there are no new messages before Siri offers to play back your saved messages instead.
How to access Visual Voicemail from another phone
You can also dial into Apple’s Visual Voicemail service like a traditional basic voicemail service, so you can still check your messages when you’re away from your iPhone or otherwise unable to use it. Here’s how:
Step 1: Using another phone, dial your own mobile number.
Step 2: When you hear your voicemail greeting, press * or # to bypass the greeting.
Step 3: Enter your voicemail password.
Step 4: Follow the verbal instructions to listen to your voicemail messages. This may vary between different carriers.
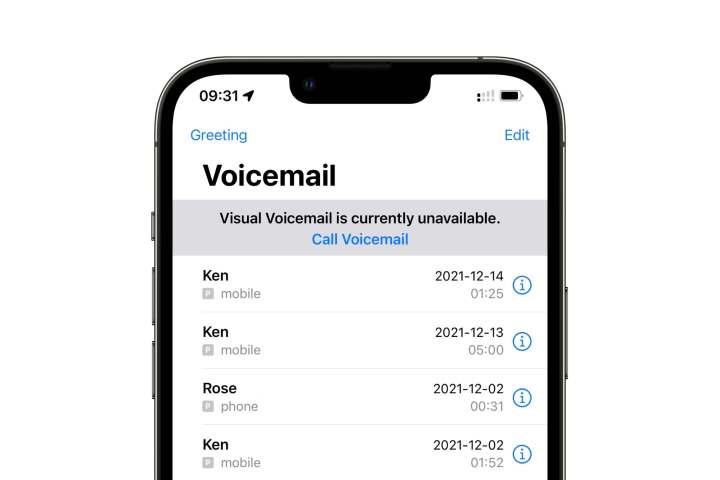
Also note that since Visual Voicemail requires a data connection, it won’t be available if your cellular data is off and if there’s no Wi-Fi network nearby. In this case, you’ll see a message at the top of your Voicemail screen letting you know that Visual Voicemail is currently unavailable, along with a Call voicemail button that can be used to dial into your voicemail directly.
Jesse Hollington / Digital Trends

Jesse Hollington / Digital Trends
How to change your voicemail greeting
Although you’ll need to choose a greeting when you first set up Visual Voicemail on your iPhone, it’s easy to change at any time. You can even switch back to the default greeting if you decide you don’t want to use a custom greeting anymore. Here’s how to update your voicemail greeting:
Step 1: Open your Phone app.
Step 2: Tap the Voicemail button in the bottom-right corner.
Step 3: Tap Greeting in the top-right corner of the screen.
Step 4: If you’re using a Dual SIM configuration with more than one phone line available, choose which line you’d like to update the greeting for.
Step 5: The next screen will show you your current greeting settings.
Step 6: If you’re using a custom greeting, you can tap Play to listen to it or Record to record a new one. You can also tap Default to switch back to the standard default greeting, which usually offers up an automated voice that says you’re not available and reads back your phone number.
Step 7: If you’re using the default greeting, you can tap Custom to switch to a custom greeting instead. Tap the Record button to begin recording your greeting, and tap Stop when finished. To listen to your greeting, tap Play. You can also hit Record to erase the previous recording and try again.
Step 8: When you’re satisfied with your greeting, tap Save in the top-right corner.
How to use Visual Voicemail Transcription
Once you’ve set up Visual Voicemail, you may also be able to take advantage of Voicemail Transcription, a feature that Apple introduced in iOS 10 that uses Siri’s on-device intelligence to attempt to translate your voicemail messages into readable text. It’s not perfect, but it’s usually enough to get a gist of what the person wants, and it can be a great timesaver if the message is something really simple, like, “call me back,” since it will save you the trouble of listening to the message.
Since Voicemail Transcription occurs entirely on the iPhone, and not on Apple’s servers, it only works on the iPhone 6S and later models. You’ll also need to be running at least iOS 10, and Siri’s language must be set to either English (United States) or English (Canada).
Step 1: Open your Phone app.
Step 2: Tap the Voicemail button in the bottom-right corner.
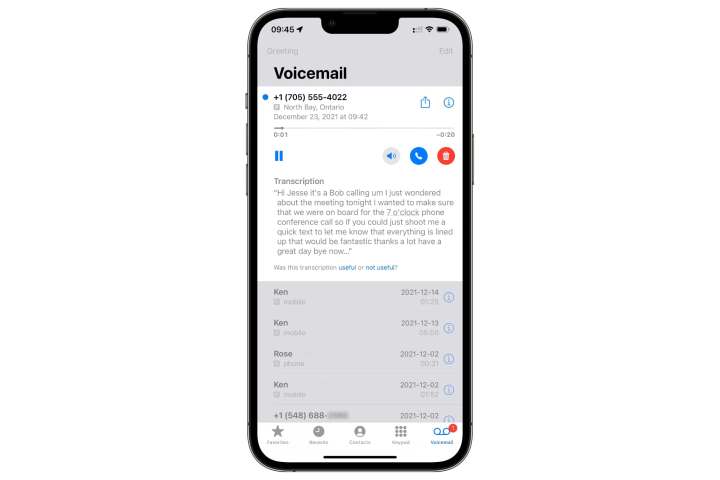
Step 3: Tap on a voicemail message to open it. If Voicemail Transcription is working properly, you should either see a transcript of the message below the playback button or the phrase Unable to transcribe this message if your iPhone wasn’t able to make any sense of it at all. Note that for longer transcripts, you may need to scroll to read the whole thing, as the voicemail details only expand so far.
Jesse Hollington / Digital Trends
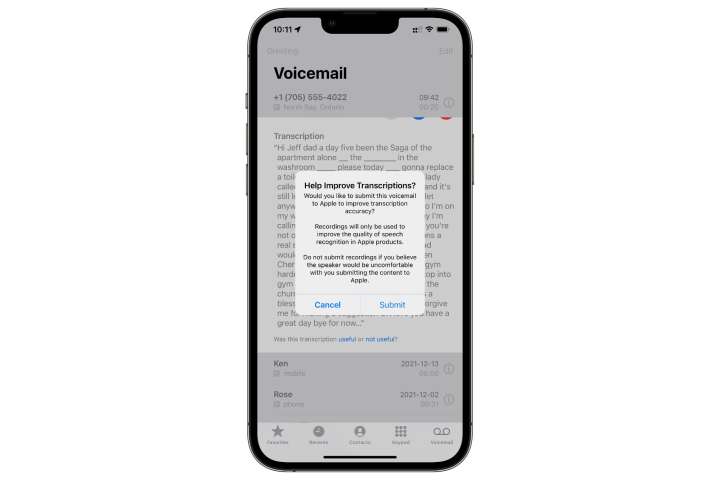
Step 4: At the bottom of the transcript, you’ll see buttons where you can offer feedback to Apple on whether a transcription was useful or not. If you tap one of these buttons, you’ll be notified your voicemail message will be sent to Apple for analysis and asked to confirm that you actually want to do this. Choose Submit to send the voicemail to Apple or Cancel to change your mind. If you cancel, no information is sent to Apple.
Jesse Hollington / Digital Trends
How to set up basic voicemail
If your carrier doesn’t support Visual Voicemail, or it’s simply an add-on you’d rather not pay for, then you can still set up basic voicemail on your iPhone. The exact setup procedures for this will vary depending on your carrier, although they all typically follow the same steps of dialing the correct number and setting up your voicemail over the phone. Here’s a quick overview of how this works for the major U.S. carriers:
AT&T: You can find AT&T’s specific instructions here. Tap 1 or the Voicemail button to specifically navigate to your voicemail. You will be prompted to choose or record a greeting if you have not done so previously. AT&T will request that you create a password. If you get many calls, you can choose to upgrade your voicemail for more storage, but that isn’t necessary for visual voicemail.
Verizon:: Verizon’s website offers an FAQ help page to set up voicemail on an Android phone. If you’re an iPhone user, though, you’ll need to check out Apple’s specific instruction page to get visual voicemail set up.
T-Mobile:: T-Mobile sends users directly to Apple’s instruction page to launch visual voicemail.
Frequently Asked Questions
How do I activate voicemail on my iPhone?
You can set up and activate voicemail on your iPhone by doing the following:
- Open the Phone app.
- Tap the Voicemail button.
- Tap Set Up Now.
- When prompted, enter a passcode.
- Select Default to use the standard visual voicemail greeting, or Custom to record a message of your own.
How do I turn my voicemail back on my iPhone?
If the voicemail on your iPhone isn’t working and you need to turn it back on, it may be that you haven’t set it up properly. If that’s the case, open the Phone app, tap Voicemail, and then go to Set Up Now.
An alternative culprit may be that you have unwittingly turned on call forwarding on your iPhone. You can check by going to Phone> Call Forwarding and checking to see if the feature has been enabled.
How do I set up custom voicemail on my iPhone?
To set up a custom voicemail greeting on your phone, first you’ll want to go through the voicemail setup process by doing the following: tap Phone> Voicemail> Set Up Now. Now choose Custom to go about recording your own greeting message.
Editors’ Recommendations

