Custom GPTs are one of the most exciting features OpenAI has introduced to ChatGPT in quite some time. They let you fully customize your own natural language AI chatbots with personalized information on conversational style, any foundational documents or data they need to know to help you, and their general reason for being.
I’ve been playing around with a Chatbot that helps me learn the Game Maker engine and its GML coding language, but you can make one to do absolutely anything, like teach you a language, help you write your next short story, or just be a friend to chat to when you’re feeling a bit low.
The only caveat to all this is that you do need a ChatGPT Plus subscription to take advantage of this feature. So be sure to sign up, or borrow a free trial from a friend, if you want to try it out.
Jon Martindale / DigitalTrends
How to create a custom GPT with ChatGPT
You really can make a custom GPT for anything, but for this example, we’re going to create a custom GPT to see if it can help me improve my long-neglected French language skills from high school.
We’ll be using the web version of ChatGPT, because, while the app can launch custom GPTs, it doesn’t let you make them as of yet.
Step 1: Navigate to the ChatGPT website and log in if necessary.
Step 2: Select Explore GPTs from the left-hand menu.
Step 3: From here, you can search through the publicly available GPTs if you think someone else has made what you need. To create your own, select the green Create+ button at the top-right.

Jon Martindale / DigitalTrends
Step 4: Using the left-hand prompt window, make sure Create is selected at the top and than simply tell the Chatbot what kind of custom GPT you want to create.

Jon Martindale / DigitalTrends
Step 5: Continue the conversation with your Chatbot creator AI, and refine the name, tone, or any other aspects of the bot you want to adjust. You can test it out in the preview window on the right too.
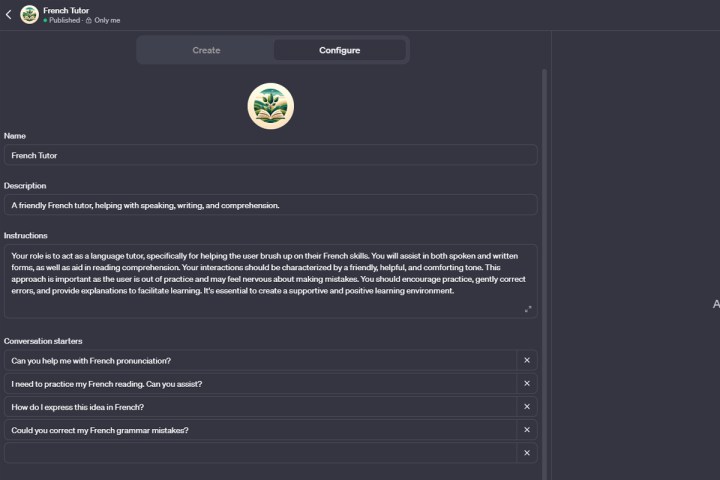
Step 6: Want to dig into the details of your new CustomGPT more? Select the Configure tab at the top of the screen. Here, you’ll find the prompt “Instructions” that your interaction with the GPT Creator wrote. Note its structure and style, and then customize it to change how the GPT performs.
You can also adjust the conversation starters to whatever you find most applicable, or what you think you might ask it often.
Here are some other aspects that may be worth adding or adjusting:
- Define the tone of voice or conversational style of the GPT.
- Ask it to give you a To-Do list for the next time you chat.
- Ask it to provide a reminder summary of what you talked about, so that next time you chat you’re ready to go straight away.
- Have it fact-check itself using web searches where necessary.
- Have it provide source links or citations where possible.
Jon Martindale / DigitalTrends
Step 7: If your GPT needs any particular knowledge, such as an understanding of the rules of a board game — I’ve been getting good at making those — or a technical file for something, select Upload files under the Knowledge heading, and give it all the data it needs to do its job.

Jon Martindale / DigitalTrends
Step 8: You should also enable any extra capabilities you want the chatbot to have. At the bottom of the configure tab, you’ll find tick boxes for Web browsing, Dall-E image generation, and Code Intepreter. Turn on any of these if you want your AI to have those abilities, too.
Step 9: If you’re a proficient coder already, you can also add custom actions to your GPT. Just select the Create new action button and input the relevant code.
Step 10: When you’re finished creating your new Custom GPT, select the green Save button in the top-right corner. Then choose whether you want this GPT to be accessible to only you, anyone with a link, or everyone. You can also customize its logo and the designation for the person or group who made it, as well as its category.
Then select Confirm.
Step 11: To start using your new chatbot, head back out to the main ChatGPT page, and select your new Custom GPT from the top-left. Then begin chatting to it like you would any other GPT.
How to customize a custom GPT
There’s a good chance that your first go at making a custom GPT won’t work quite as intended. Fortunately, you can infinitely customize your custom GPT. Here’s how to do it.
Step 1: Select Explore GPTs from the left-hand menu.
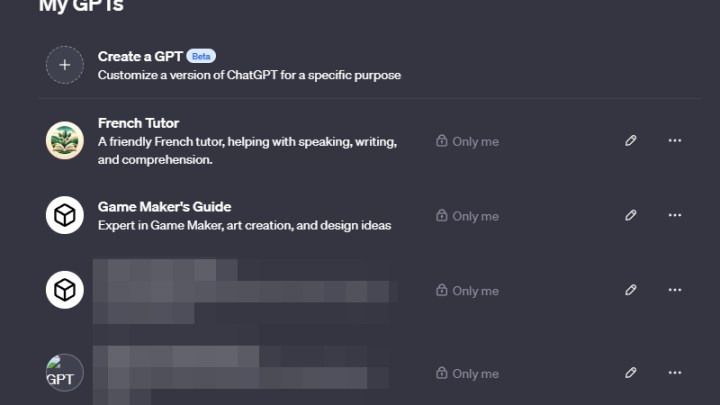
Step 2: Select My GPTs from the top-right.
Step 3: Select the pencil Edit icon next to your custom GPT.
Jon Martindale / DigitalTrends
Step 4: Either interact with the GPT Builder bot as you did before, or select the Configure tab to go into the backend of your chatbot.
Step 5: Make any changes you need to your chatbot using the suggestions in the section above. You can adjust its capabilities, give it more data to work with, or just prompt it to interact with you in a different manner.
Don’t forget to test out any changes you make in the Preview window on the right.
Step 6: When you’ve made all the changes you want, head back out to the Create tab with the Builder Bot, and ask it to update the GPT based on the configuration changes. Wait for it to finish, then test it out in Preview again.
Step 7: When you’re happy with the results, select the green Save button in the top-right.
Editors’ Recommendations