
Formatting an SSD is the best way to boost its performance or clear out any potentially malicious malware whenever you move it to a new system, purchase one second hand, or plan to sell yours on to someone else. While SSDs do offer incredible performance, that can degrade over time, and the last thing you want is your data ending up in the hands of someone else.
Fortunately, cleaning out a drive and returning it to its near-factory-fresh state is pretty straight forward. Although you’ll need to take precautious to back up any important data, you can get your drive back to fighting fit shape in now time. Here’s how to format an SSD on a Windows PC.
How to format a SSD using Disk Management
There are a bunch of third-party tools that can help you format a SSD. However, the built-in Windows Disk Management utility is capable of doing the same. It can also be used to create new partitions of your SSD.
Note, however, that while this is a good way to improve system performance, it does not completely erase old data. So if you are selling your drive on to someone else, you’ll want to perform a more robust format, such as “zero-filling” the drive (see below).
Step 1: Open the Start menu, type diskmgmt.msc, and hit Enter to open the Disk Management utility.
Image used with permission by copyright holder
Step 2: From the list of drives, select the SSD that you want to format. Make sure that you select the right SSD, as you will lose all of your data.

Image used with permission by copyright holder
Step 3: Once you have identified your SSD, right-click on it and select Format.

Digital Trends
Step 4: A new pop-up should open where you must select the File system as NTFS, Allocation unit size as Default, and uncheck the Perform a quick format box. If you wish, you can also rename your SSD by typing the name in front of the Volume label field.

Image used with permission by copyright holder
Step 5: Click OK to begin the format process.
Step 6: Windows should now format your SSD.
How to format an SSD using File Explorer
Another simple way to format your SSD is by using the default Windows File Explorer. It works pretty much the same way but with fewer steps.
Step 1: Open the File Explorer and search for your SSD from the list of drives and folders on the left.

Image used with permission by copyright holder
Step 2: Right-click on the SSD and select the Format option. Make sure you have selected the correct SSD as you don’t want to end up losing important files.
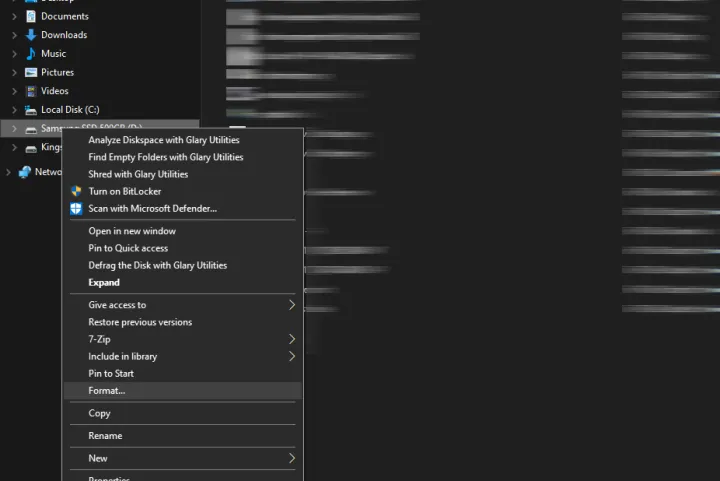
Image used with permission by copyright holder
Step 3: A new window should open where you need to select the File system as NTFS, Allocation unit size as Default allocation size, and uncheck the Quick format box. You can also rename your SSD by typing the name in front of the Volume label field.

Image used with permission by copyright holder
Step 4: Click on the Start button at the bottom to begin the process.
Step 5: Windows should now format your SSD.
How to format an SSD using the zero-fill method
Where standard formatting merely makes your SSD “forget” where all your files are, leaving them still accessible to someone determined enough to find them, zero-filling your drive erases everything to a much higher standard. It completely wipes your storage device by writing zeroes to every bit, thus making it much harder for any sort of data recovery. Here’s how you can format an SSD using the zero-fill method.
Step 1: Open the Windows Start menu, type CMD, and select the Run as administrator option to open Command Prompt with administrative rights.
Step 2: Once Command Prompt opens, type format Drive Letter /fs:NTFS /p:0. Make sure you double-check and pick the correct SSD to format. In our case, we want to format the D: drive, so we need to type format D: /fs:NTFS /p:0.
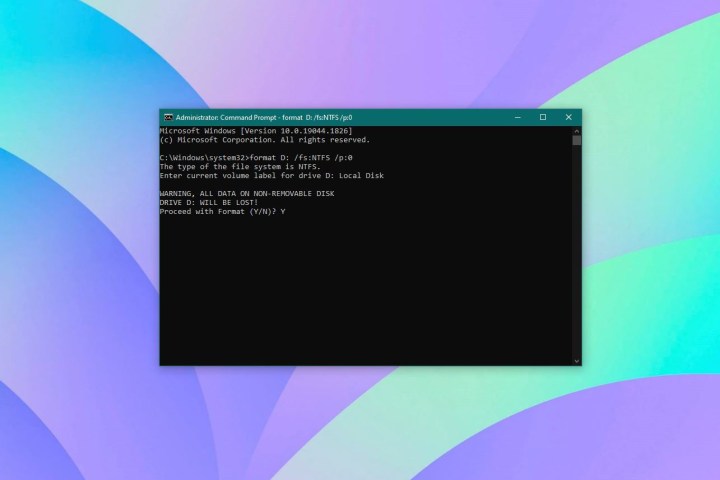
Image used with permission by copyright holder
Step 3: Next, enter the current volume label or name of the disk drive and hit Enter.
Step 4: A warning message should appear where you need to type Y to confirm your action.
Step 5: Windows should now format your SSD using the zero-fill method. It might take a while depending on the size of the SSD.
Looking to upgrade your SSD after ditching the old one? Here are the best SSDs you can buy in 2024. If you’d like some added tips on how to pick an SSD, check out our SSD buying guide.
Editors’ Recommendations


